When it comes to website loading times, one of the biggest factors affecting your page speed are images. Learn how to optimise images and improve your website’s performance.
Images are everywhere online. It’s quite possible that you have never seen a web page without them. After all, a picture is worth a thousand words, so a single image can be effective when conveying your message to a visitor. It should be no surprise then that images play a huge role in website performance. Optimising images can dramatically affect your page loading times and create a better page experience for your visitors.
From a technical perspective, images are a lot larger than words and can have rather massive file sizes if not optimised for your website.
Today we’ll focus on improving the technical side of images, and in a future blog post, we’ll give you some tips on optimising images to help with organic traffic to your website.
Tips to optimise image performance
There are a variety of ways to optimise an image for your website. We’ll cover a few improvements you can make that have the biggest impact on performance.
1. Reduce the file size
Whenever a web page is loaded to become visible to a visitor, it has to load all of the files required for that page. Images require significantly more space to store than text or code and often make up the bulk of your web page, if not optimised. Photos in particular often fall into this category as they are taken at very high resolutions.
These look great, but more often than not, far too good for a web page, and can have their file size reduced with no difference in quality.

The main advantages of reducing image file sizes are:
- Making your web pages load faster. This is actually a ranking factor in search engines, so faster pages result in a better ranking.
- Reduced time for Largest Contentful Paint (LCP). One of the Core Web Vitals of page experience that measures the time before the largest single image/element appears on screen. Faster is better.
- Less bandwidth required. Sending and receiving any information over the internet requires bandwidth, which costs both time and money. Reducing file sizes lowers the required bandwidth.
There are a myriad of ways to reduce the file size of an image. We’ll go over how you can use Squoosh online to quickly optimise an image. Other options include image editing software, such as Photoshop or GIMP or other online tools like Canva.
2. Choose the correct file type
Reducing the file size is one thing, but if you use the wrong file type for your image, your efforts may be wasted. There are many different file types available for images, each with their own advantages and disadvantages. Some of the most common file types for web pages are:
- JPEG (.jpeg | .jpg)
- PNG (.png)
- Bitmap (.bmp)
- GIF (.gif)
- WebP (.webp)
You may recognise some of these, and others perhaps not. We’ll go over each of them and what kind of impact they have on your web page.
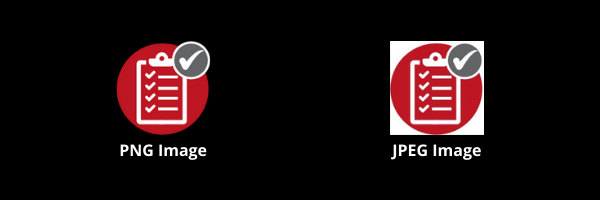
JPEG (Joint Photographic Experts Group)
One of the most common file types for web pages, JPEG images have excellent compression and support a large number of colours. This makes them ideal for most website images, especially photos and other images that have a large file size before optimisation.

JPEGs do however suffer from artefacts, especially at high levels of compression. They also struggle when it comes to images with a few colours or that require sharp details.
PNG (Portable Network Graphics)
The PNG format is a good alternative to JPEG for web images. They tend to have a larger file size, but also support lossless compression (no reduction in quality), and a similar number of colours. PNG files also have the advantage of supporting transparency within images. This is fantastic for logo images or images that appear on coloured backgrounds, such as icons.
Bitmap
One of the older file types, a favourite for those of you familiar with MSPaint. Bitmapped images are generally not suitable for web pages, as they have massive file sizes. This is because every single pixel within an image is saved individually. This results in a pixel-perfect image, which is very useful if editing images. However, for uploading to your website, we would recommend converting it to another format first.

GIF (Graphics Interchange Format)
If you are at all familiar with internet memes or use instant messaging platforms, you have likely already seen GIF images. These don’t compress very well and have a limited selection of 256 colours available. However they do support transparency and most importantly, animation. Multiple frames (individual images) can be stacked together in a single image file and played in sequence.
This makes GIF images ideal for small images that are animated, though for bigger images, a file type such as JPEG would be more useful.
WebP
One of the newer image file types, developed for web pages specifically. Created by Google in 2010, it was designed with image quality and compression in mind. It supports lossless compression with smaller file sizes than PNGs and lossy compression with smaller file sizes than JPEGs.
It also supports transparency much like PNG files, though it also offers this at both lossless and lossy compression levels, depending on what you need the image for.
The downside of WebP since it was introduced is that as a newer file format, it’s taken some time to be accepted and used by web browsers. This has been less relevant as time passes though, with many common browsers now natively supporting it, such as Chrome, Microsoft Edge, Firefox, Opera and native Android browsers, though some do still lack support at this time.
3. Don’t use images for decorations
Some websites make clever use of images for visual effect. This could be things like a flashy bar across the screen, a red background for a particular section of the page, or even a single, large background image. Some of these do look rather impressive, but often have a significant resource cost to your web page. Every image that loads, even when optimised, will take up some space and time.

Instead of images, it would be worthwhile to use more efficient methods to display similar effects. One method would be updating the page style sheet so that rendering is done with CSS instead. This definitely gets technical, especially if you already use a theme, so test thoroughly before making any changes. A few lines of code (text) is massively more efficient than loading an entire image.
4. Make sure your thumbnails are optimised
If you sell a lot of products, you probably use a huge amount of thumbnail images. These are very small images that show the product at a glance. You may think that there’s no need to optimise images that are smaller.

However, quite often a thumbnail is just a larger, fuller product image that is being displayed at a small scale. This impacts page performance significantly, especially if you are displaying a lot of products on your page at the same time. If a much larger image is being loaded per product, that all adds to the time it takes for the page to load.
5. Consider a Content Delivery Network (CDN)
If your website is still loading pages slowly because of your images, there are other options. One is using a Content Delivery Network to host your image content. They have a variety of features for displaying images, including showing them in different sizes, formats and with special effects like cropping and better security for your images.
Content Delivery Networks are usually optimised to deliver images and other media to your webpage as quickly as possible.
One thing to keep in mind is where images are hosted. If using a third-party CDN and images are hosted on their website domain instead of yours, then anyone who links to those images will not be linking to your website.
How to resize an image online using Squoosh
So you have found an image that is way too big and you want to optimise it for your website. Great! So how do you get started? We have mentioned there are image editing software and online tools, so we’ll run through the steps on how to optimise an image using Squoosh.
1. Open up the Squoosh website, which can be found at https://squoosh.app/
2. Upload your image into Squoosh. This can be done by navigating to your image file, or dragging and dropping.
3. You’ll now be able to see your image. Notice there’s a vertical slider in the middle of the screen. You can drag this left and view the original image against the updated, compressed version in real time.

4. At the bottom of the window, you’ll see a few bits of information, including the expected file size of the image, after optimisations are made.
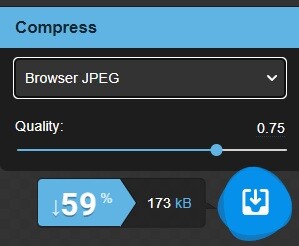
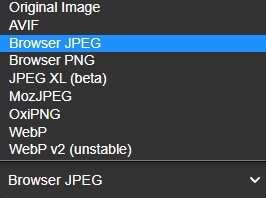
5. The dropdown under “Compress” will determine what format you want the file to become. In our case, it’s a photo for a web page, so we’re quite happy with the default option of BrowserJPEG. Alternate image formats are available by opening the drop down, including some we haven’t covered today, so be sure to experiment to find out what works best!
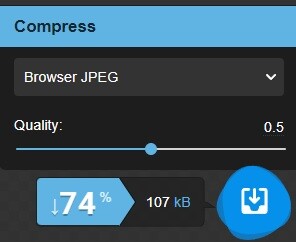
6. Once happy with the chosen format, the Quality slider can be adjusted. Higher results in a better quality image and increased file size. Adjust the slider up and down to find out what level of quality is acceptable for your image. We’ve lowered ours to 0.5, as that will reduce the file size significantly.
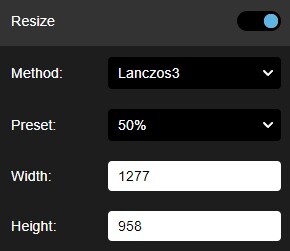
7. To optimise the image further, we can also resize the image to reduce the file size again. You can either enter a new size manually, or choose a preset. In our case, we’ll choose to resize it to half of it’s original size (50%).
8. Finally, we can check what kind of savings we’ve made. As you can see, the image file size is now a whopping 74% smaller. By clicking on the blue download button, the image will be saved and you can upload your newly optimised image to your website.
As part of our 31 Tips series, we also did a video specifically on image optimisation, so be sure to give it a watch and see exactly why optimising website images is important!
There’s more to it than that…
Hopefully you’ll have learned something new about image optimisation and why it’s important for your page loading speeds. By optimising images on your website, you can create a better page experience for your visitors.
This is only one part of image optimisation though. In a future blog we’ll be giving you some more tips on how to optimise your images for organic traffic and search engine ranking position (SERP), to increase the number of visitors who can find your website online.