Events are the foundation for all tracking within Google Analytics 4. They are significantly different from existing events that you might be used to in Universal Analytics (UA). Today we’ll explain a few of those differences and how to set up your own Google Analytics 4 event tracking with Google Tag Manager.
Why use GTM for Google Analytics 4 Events?
In Google Analytics 4, everything revolves around events. This includes even the most basic of tracking, such as page views or even the beginning of a new session. Knowing how to create and implement your own custom events is vital to track meaningful interactions in GA4.
While they share the same name, events in GA4 are fundamentally different from events in Universal Analytics, with a brand new structure and format.
Google Analytics 4 is still fairly new and continues to evolve with updates. Because of this we recommend using Google Tag Manager to create your events. If you don’t already use Google Tag Manager, now is the time to get started! GTM fully supports GA4 events and data collection and makes it easy to create, debug and manage your website tracking.
Events in GA4 can still be added manually as code, such as using the Global Site Tag, though if you’re still getting to grips with the new event structure, Google Tag Manager is a much more user-friendly option. We know GA4 can get quite technical at times, so we’ll do our best to keep things straightforward for now.
Differences between UA Events and GA4 Events
One of the biggest changes is that events in Google Analytics 4 use an entirely new structure. These events are designed to be much more flexible and handle any kind of interaction that can occur on a web page.
Currently events in Universal Analytics look like this:
- Event Category – mandatory field, what the event is related to.
- Event Action – mandatory field, what the user acted upon.
- Event Label – optional field, an additional label.
- Event Value – optional field, if the event had any monetary value.
For a Click to Call event, where a user clicks or taps on a telephone number to call a business directly, this may look like the following:
- Event Category – Click to Call.
- Event Action – The URL that was clicked on, in this case the phone number.
- Event Label – Page URL where the event happened.
- Event Value – what the click was worth to the business (e.g. 10 pence).
In Google Analytics 4, there is only 1 mandatory field for events, which is the event name. However, GA4 events also have optional fields called parameters. These can be used to add additional fields with information and context for your events. At the time of writing, events can have up to 25 parameters per unique event. That’s a lot of data that can be included. A similar event in GA4 may look something like this:
- Event Name: Click To Call
- click_url: tel:01234567890
- page_url: https://www.aillum.com
- click_element: phone_btn_footer
- hour_of_day: 14
This is just a simple example, but already more information can be tracked in a single event. With proper implementation of Google Analytics 4 events, interactions on your website can be tracked with incredible precision and accuracy.
Setting up Google Tag Manager for GA4 Events
The first thing we would recommend you do (if not already done) is set up the GA4 Configuration Tag in Google Tag Manager. This is an intermediary tag that you can save your GA4 settings into, and have those settings apply to your GA4 Event Tags as you create them, rather than manually adding information every time you create a new tag. You will only need to set up this tag once.
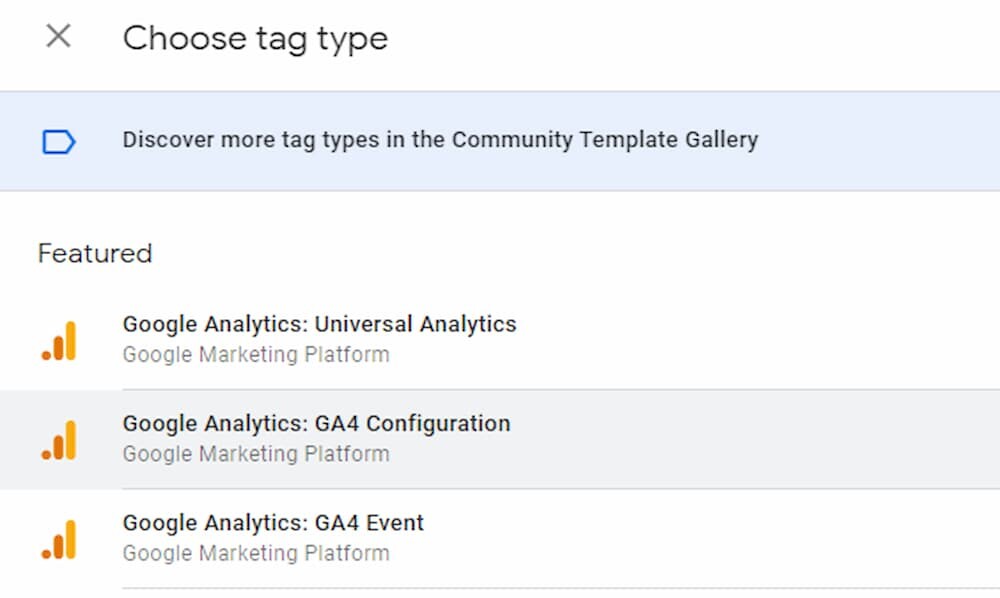
To begin, create a new tag, of the GA4 Configuration type.
The main piece of information you’ll need for this tag is your Measurement ID. This can be found in Google Analytics 4, under Admin > Property > Data Streams.

Adding this to your configuration tag will allow you to send information from Google Tag Manager directly to your Google Analytics 4 account.
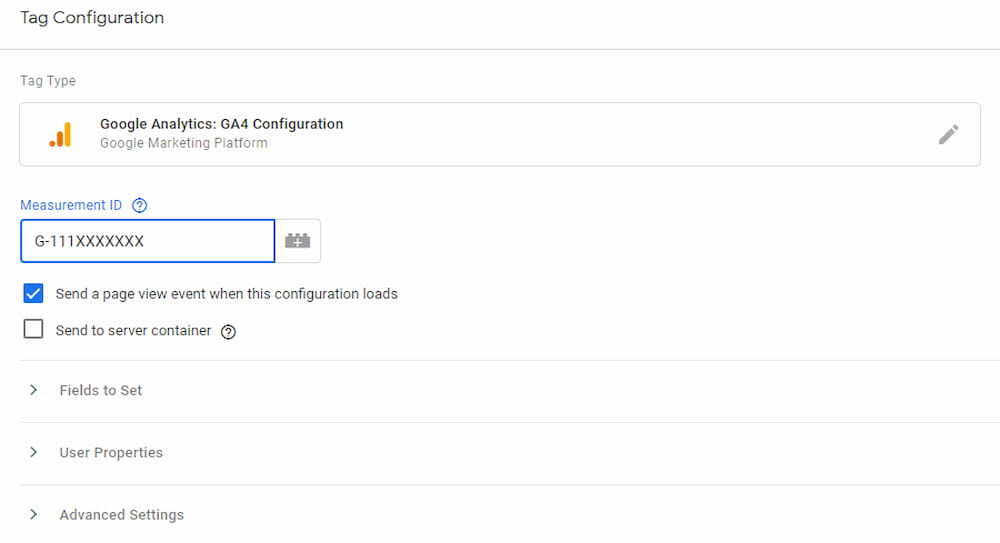
Add a trigger to set this tag to fire on “All Pages” and save the tag.
Creating your first Google Analytics 4 Event
As events are used for everything in Google Analytics 4, there’s a lot of flexibility when it comes to creating them yourself with tags. Be sure you have Google Tag Manager installed and set up (get in touch if you need help with this).
Best Practices for GA4 Events
Before setting up your first event, it’s handy to check to make sure that GA4 doesn’t already fire the same kind of event. There’s a small list of events that GA4 will automatically collect by default:
- Page View.
- First Visit.
- File Download.
- Session Start.
- Video Start.
- Video Progress.
- Video Completed.
- View Search Results.
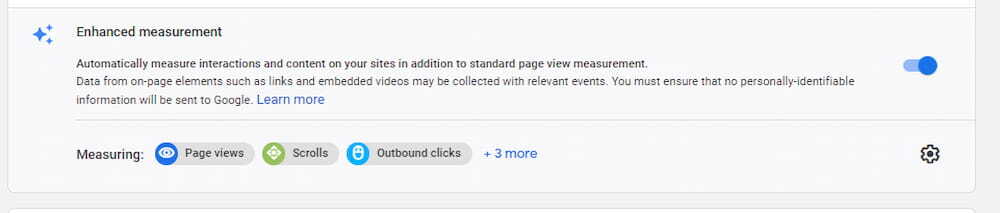
Additionally, if you have Enhanced Measurement enabled, the following events will also collect data automatically:
- Site Search.
- Scroll.
- Outbound click.
You can switch on Enhanced Measurement within the GA4 Admin Area in the same location as your Measurement ID.
We’d also suggest having a quick look at Google’s recommended events to get some ideas of what events you could implement yourself and how to name them.
Building the GA4 Event Tag
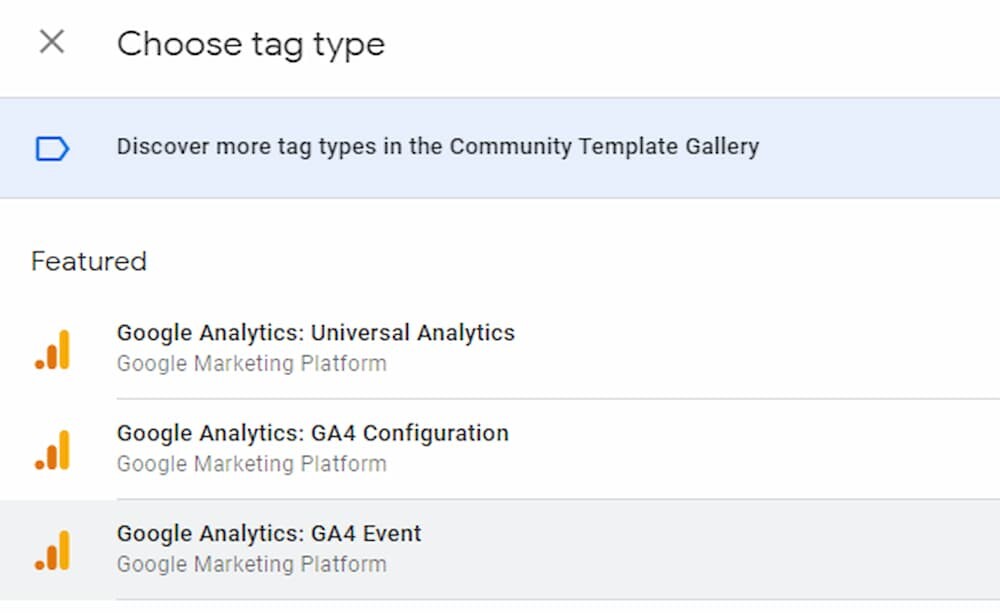
If the event you have in mind doesn’t exist already, great! You can now start setting up your own event from scratch in Google Tag Manager.
To start, you’ll want to create a new tag. Google Tag Manager allows you to create Google Analytics 4 specific tags to fire events in the new format, so select “Google Analytics: GA4 Event” as the tag type.
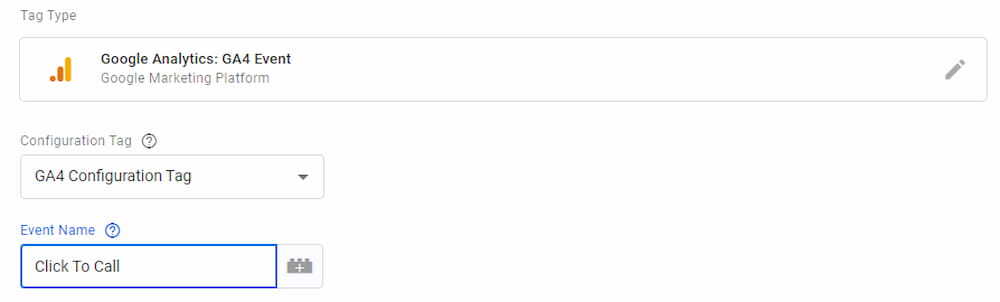
The first thing to do with your new tag is select your GA4 Configuration Tag, which we set up earlier. This will let your event tag know which GA4 property it should be sending events to.

Next, you’ll want to name your event. We would recommend sticking to a specific naming convention when choosing event names, as it will make them easier to sort and read when looking at the data within Google Analytics 4. We’ll be setting up an event to track phone number clicks/taps across the entire website, so we’ll name this event “Click To Call”.
That is all that is required for a GA4 event. With the appropriate trigger, the event will be sent to Google Analytics 4 when someone clicks on a phone number. However, we want to send a bit more information across, so let’s set up a few event parameters. As mentioned above, these are additional bits of information that give events more data and context.
We’d like to know what number they clicked on (especially if we have multiple phone numbers) and what page they clicked on the phone number. So we can add a couple of parameters.
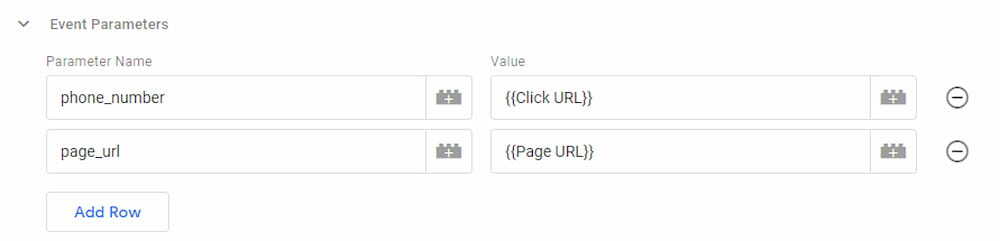
We need to actually give these parameters some data. Thankfully we can use Google Tag Manager’s in-built variables to populate them with data, in this case, Click URL and Page URL.
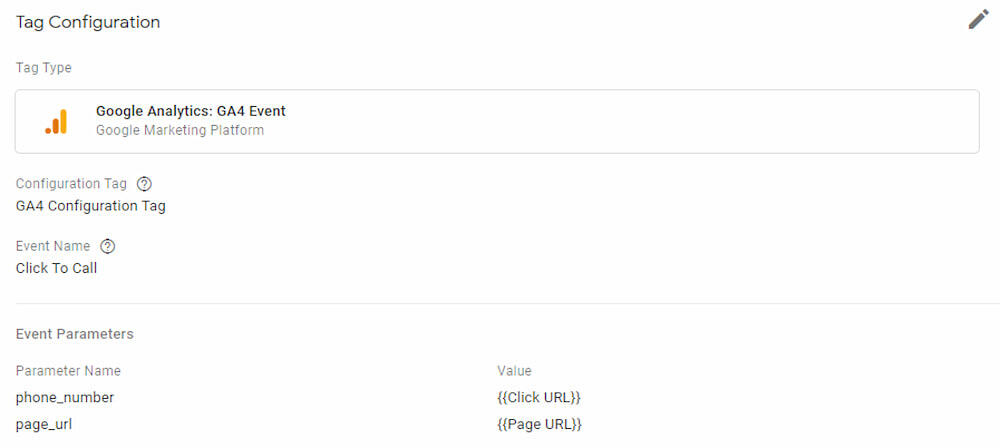
There are more advanced options, but this will do for our first basic GA4 event in Google Tag Manager. Name your tag, add your appropriate trigger and you are done. Remember to test and debug your tag before publishing it to make sure it all works!
The first of many GA4 Events…
This is just a brief introduction to setting up GA4 events within Google Tag Manager to get you started. There’s a lot of advanced options available we haven’t covered yet, with today being just the tip of the iceberg. Events in Google Analytics 4 have a high degree of complexity compared to existing Universal Analytics events, and GA4 itself is still being developed with new features. Keep an eye out for our future blog posts where we’ll be diving a little deeper into Google Analytics 4 events and features!