Improving the loading speed of your website can have multiple benefits: lower bounce rates, higher conversion rates and improved rankings in search engines being just a few. So tip 8 is all about tackling a common quick win when it comes to site speed: Optimising images.
To keep up with all 31 tips, visit the full list here, or join the newsletter for a weekly summary email, or follow us on your preferred social channel: LinkedIn, Facebook, Twitter, Instagram, Pinterest or subscribe to our channel on Youtube.
What do we mean by Site Speed?
In short, we’re talking about how fast a web page loads. Not just how fast it appears to load for you when you visit it in your browser, but also how quickly it loads in the eyes of search engines, when their algorithms crawl the website.
Each web page has to load a number of items before it can be fully interacted with. Such items can include:
- Images on the page (header images, logos, icons, background images etc)
- CSS Code (used to style the layout of the page)
- Javascript code (used for a lot of the functionality on the page)
- Tracking scripts
- Embedded widgets (social feeds etc)
Load speed can also be influenced by other factors, such as:
- Server Performance
- Caching setup
- CMS Platform the site is built on
While each may only take milliseconds to load, milliseconds soon add up over multiple items. The more items you have on your website, the higher the potential for the site to load slower.
Why are we focusing on image optimisation in this tip?
Dealing with site speed can be technical. Not everyone knows what Javascript and CSS are, let alone how to deal with them, for example.
However, we do all mostly know what images are … and often they are a “low hanging fruit”, when it comes to tackling site speed.
What’s more, there are a couple of free tools available to help make the optimisation process fairly simple.
Finding images to Optimise with GTMetrix
The first stage is to find any images that are impacting load speed of your website, and that can be done using a tool called GT Metrix: https://gtmetrix.com/
Visit GT Metrix and enter your web address. There are other speed test tools, but we think GT Metrix explains the results better.
If images haven’t been optimised on your website, you’ll find the following items in your report. Both explained in more detail below.
- Serve Scaled Images
- Optimise Images
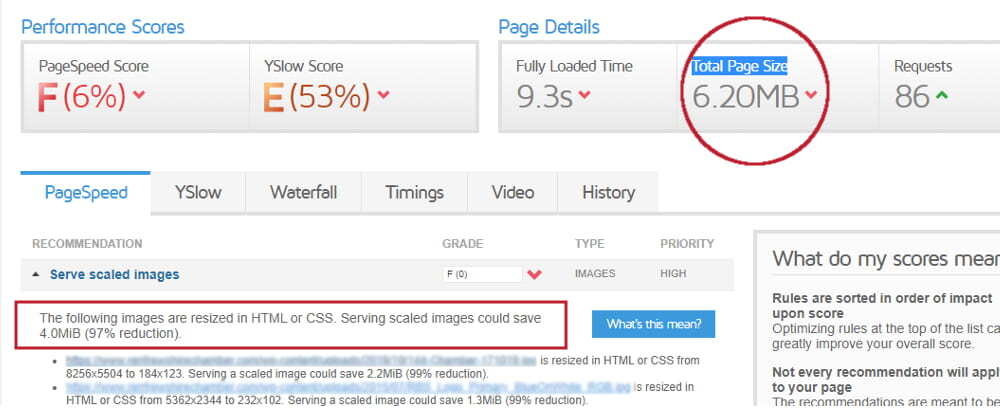
On the above screen, “Total Page Size” is 6.2MB. The “Serve Scaled Images” recommendation alone could cut that by 4MB if implemented.
That’s a massive 60% saving on page size just by dealing with images.
You’ll also note that it tells you which images are causing the issues!
What does “Serve Scaled Images” mean?
In short, you should upload the image to the website at the size it will appear on screen. Possibly better explained with an offline analogy …
Imagine you need a new carpet for a 5m x 5m room in your house. If the carpet is delivered in a 10m x 10m roll, you (or the carpet fitter) would need to spend time cutting it to the correct size.
If it was delivered at 6m x 6m, there would be a lot less cutting time required. Delivery at 5m x 5m would be even better!
“Service Scaled Image” is the image optimisation equivalent of reducing that cutting time.
If you want to display an image on your website at 200px x 200px, crop it and upload it at that size. If you upload it as 600px x 600px, then work is required during page load to bring it down to 200px x 200px … and that takes time.
So, tackle “Serve Scaled Images” by uploading the image at sensible size in the first place.
What does “Optimise Images” mean?
Easier to understand. This is really just about quality. Image quality can be much lower for the web than needed for print, and still look good. It means the actual file size (KB) can be much lower.
Optimise Images with Squoosh!
Squoosh is a free browser based tool that helps you quickly optimise your images. It helps you alter the dimensions and the file quality, in turn tackling the above speed issues.
Visit https://squoosh.app/ in your browser.
You could use photoshop, or another online tool. We like Squoosh. It works really well, so that’s what we’re recommending.
Download the problem images listed in your GT Metrix reports, then follow the Squoosh instructions and “Drag and Drop or select an image”.
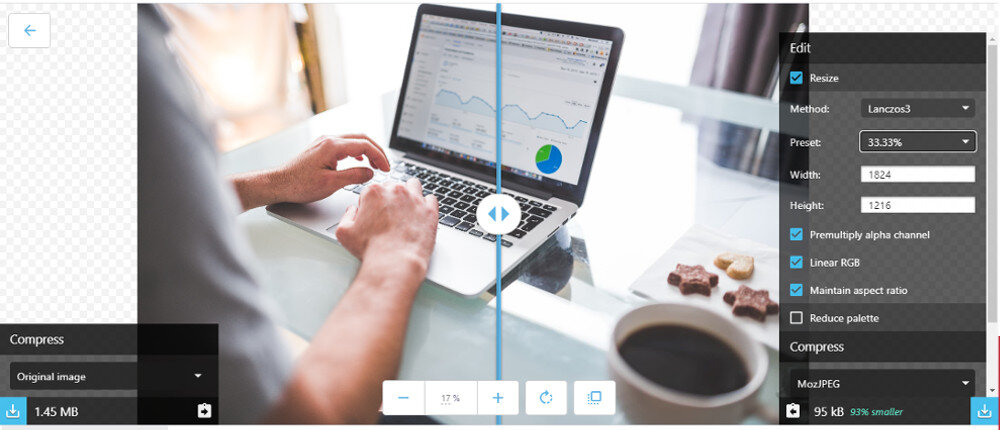
Squoosh splits the screen in 2. The left side houses the original image. The right side houses the optimised version and offers options on image size and quality.
Note how much you can reduce the quality metrics before the image actually starts looking lower quality!
Once happy, download the optimised version and upload it to your website to replace the un-optimised version.
Check the results!
Important that you take note of the GTMetrix scores before you start this process, for benchmarking. Take a note, follow the above process, then re-test on GTMetrix. You should see improvements in the Total Page Size metric, and others.
Browse all 31 tips
To catch up on all 31 Digital Marketing Tips from this series, head over to the main blog post.