Not everyone wants to review rows of data and metrics. You should, but we appreciate not everyone wants to or has the time. Heat Mapping offers a quicker / visual way to evaluate user behaviour. So tip 15 is all about setting up a free heat mapping account and getting started.
To keep up with all 31 tips, visit the full list here, or join the newsletter for a weekly summary email, or follow us on your preferred social channel: LinkedIn, Facebook, Twitter, Instagram, Pinterest or subscribe to our channel on Youtube.
What is Heat Mapping?
Heat Mapping is a visual method of understanding how users interact with a page on your website. It’s a technique used in other industries for various reasons, but for digital marketing it’s used to better visualise how users behave on your website.

Why are heat maps important?
Not everyone likes tables of data. Not everyone has the time to spend reviewing endless metrics in tools such as Google Analytics. You should find the time to do that, but we appreciate that not everyone can.
However, at the same time, website owners often want to see the performance of their website improve, but it can be hard to drive improvements if you don’t know what’s wrong in the first place.
Heat Mapping is a middle ground to get you started. It initially sits somewhere in between no analysis at all, and drowning in data.
It becomes much more powerful, but to start off it gives you some really quick and easy to understand insights.
What Insights will Heat Mapping give me?
Each Heat Mapping tool is slightly different in their offering, but in the main you’ll get 3 main reports:
- Click Map: Hot / Cold visual scale highlighting where users do / don’t click when browsing your website.
- Hover Map: Hot / Cold visual scale highlighting where users mouse hovers on the page, even without clicking.
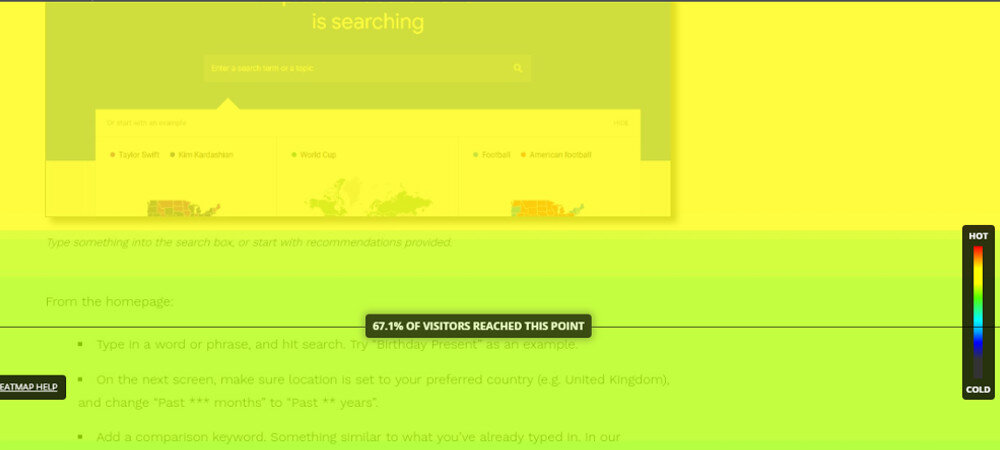
- Scroll Map (one of our favourites!): Hot / Cold visual scale highlighting how far down a pages users scroll
Within those 3 reports, you quickly get a sense of whether content is being seen (perhaps too far down a page?), whether key CTAs are grabbing attention and whether users are focusing on areas of the page you want them to be.
See examples on https://www.hotjar.com/tour/
How much will Heat Mapping cost?
That depends on how you choose to set it up. We’ve used a tool called CrazyEgg, and it’s great. It offers a free trial for a period.
We currently use a tool called Hotjar. It offers a “Free Forever” package to get you started, rather than just a free trial. Of course, being free, there are some limitations … but you can still run heatmaps on 3 different pages of your website at any one time.
Our recommendation would be to try Hotjar. It costs £0 (with limitations) and is easy to setup.
You can visit Hotjar here: https://www.hotjar.com/pricing/
How do you setup Hotjar / Heat Mapping?
Like most tracking tools, there are 2 main stages of setup:
- Register / Open an account on Hotjar.
- Add a snippet of code to your website.
Once you’ve complete those 2 steps, the actual setup of a heat map is done within the Hotjar Interface.
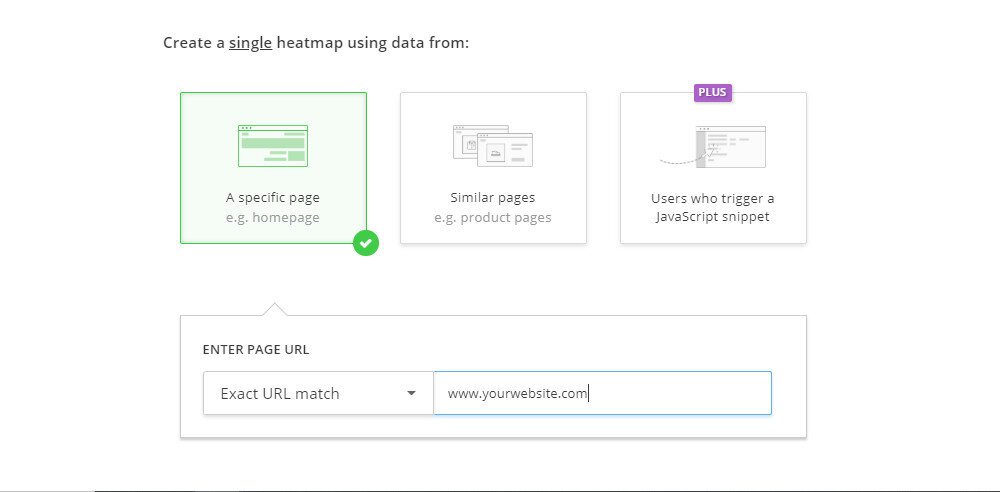
On creating a heatmap you’ll be asked to:
- Give your heatmap a name.
- Decide how many pageviews should be included (the free version limits to 1000 pageviews per heatmap)
- Paste the URL of the specific page you want to track.
- Confirm and start tracking.
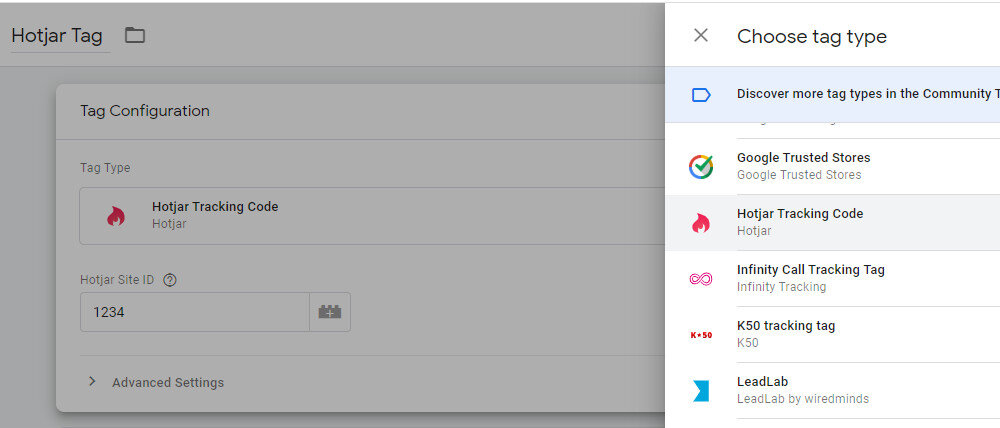
How you add the code snippet to your website depends on how your website has been setup. Options you might have include:
- Setup via Google Tag Manager, using the native Hotjar GTM tag.
- Via website plugin.
- Via Website admin area (some platforms offer a section specifically for adding code snippets)
- Speak to a developer.
Ultimately, the code snippet must go into the “Head” section of your website. Each of the above will do that.
What pages should you track with Heat Mapping?
In theory you could track every page of the site over time. Our recommendation to get you started would be to at least run Heat Mapping on the homepage.
We’d recommend you then use Google Analytics to find the 2nd and 3rd most landed on or most viewed pages of the website, and use those for heat maps 2 and 3.
[templatera id=”3898″]
Browse all 31 tips
To catch up on all 31 Digital Marketing Tips from this series, head over to the main blog post.